 Android布局管理器详细解析布局实现.docx
- 文档编号:9847781
- 上传时间:2023-05-21
- 格式:DOCX
- 页数:36
- 大小:169.87KB
Android布局管理器详细解析布局实现.docx
《Android布局管理器详细解析布局实现.docx》由会员分享,可在线阅读,更多相关《Android布局管理器详细解析布局实现.docx(36页珍藏版)》请在冰点文库上搜索。
Android布局管理器详细解析布局实现
Android布局管理器–详细解析布局实现
布局管理器都是以ViewGroup为基类派生出来的;使用布局管理器可以适配不同手机屏幕的分辨率,尺寸大小;
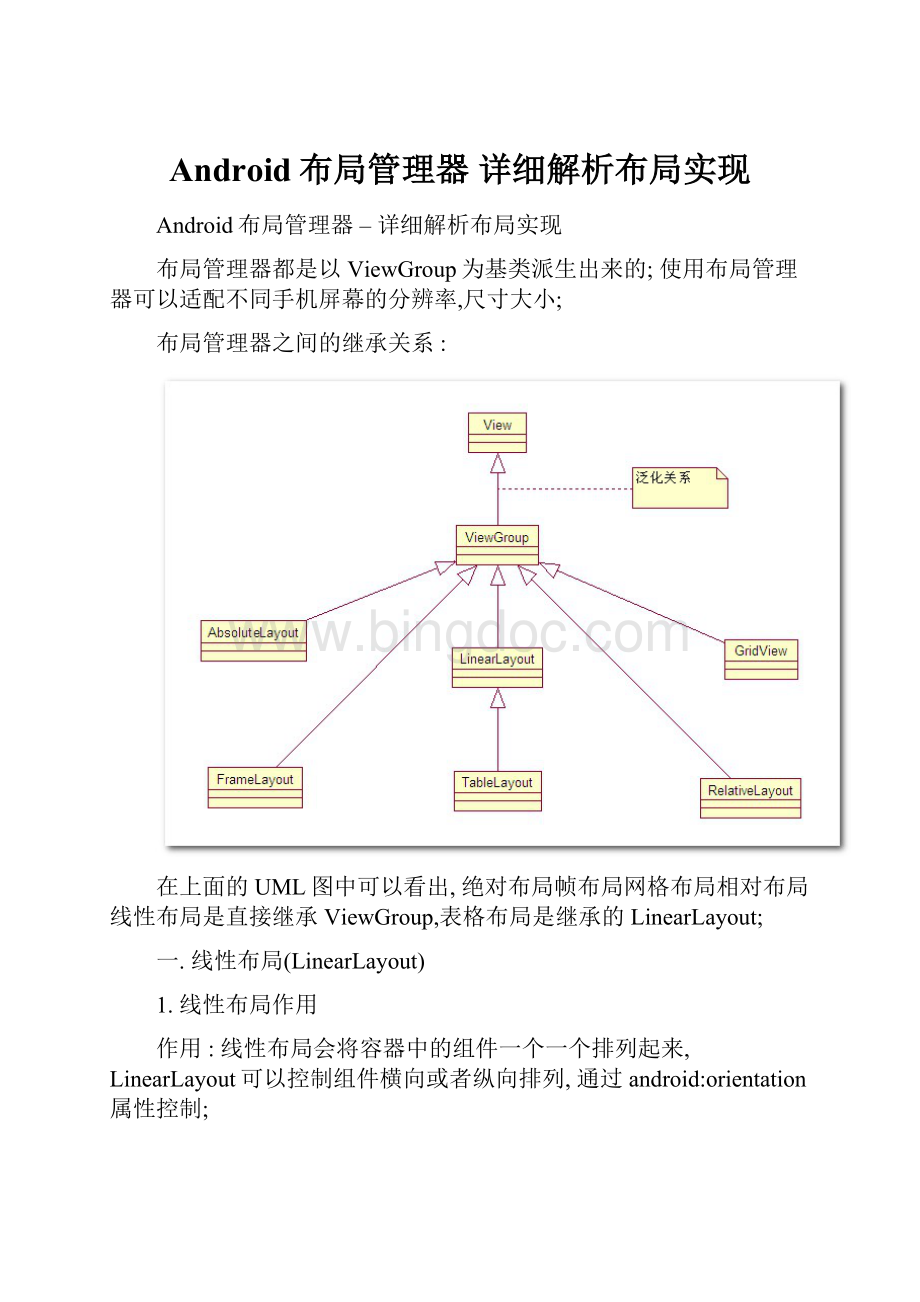
布局管理器之间的继承关系 :
在上面的UML图中可以看出, 绝对布局帧布局网格布局相对布局线性布局是直接继承ViewGroup,表格布局是继承的LinearLayout;
一.线性布局(LinearLayout)
1.线性布局作用
作用 :
线性布局会将容器中的组件一个一个排列起来,LinearLayout可以控制组件横向或者纵向排列,通过android:
orientation属性控制;
不换行属性 :
线性布局中的组件不会自动换行,如果组件一个一个排列到尽头之后,剩下的组件就不会显示出来;
2.LinearLayout常用属性
(1)基线对齐
xml属性 :
android:
baselineAligned;
设置方法 :
setBaselineAligned(booleanb);
作用 :
如果该属性为false,就会阻止该布局管理器与其子元素的基线对齐;
(2)设分隔条
xml属性 :
android:
divider;
设置方法 :
setDividerDrawable(Drawable);
作用 :
设置垂直布局时两个按钮之间的分隔条;
(3)对齐方式(控制内部子元素)
xml属性 :
android:
gravity;
设置方法 :
setGravity(int);
作用 :
设置布局管理器内组件(子元素)的对齐方式,
支持的属性 :
top,bottom,left,right,
center_vertical(垂直方向居中), center_horizontal(水平方向居中),
fill_vertical(垂直方向拉伸), fill_horizontal(水平方向拉伸),
center,fill, clip_vertical,clip_horizontal;
可以同时指定多种对齐方式:
如left|center_vertical左侧垂直居中;
(4)权重最小尺寸
xml属性 :
android:
measureWithLargestChild;
设置方法 :
setMeasureWithLargestChildEnable(booleanb);
作用 :
该属性为true的时候,所有带权重的子元素都会具有最大子元素的最小尺寸;
(5)排列方式
xml属性 :
android:
orientation;
设置方法 :
setOrientation(inti);
作用 :
设置布局管理器内组件排列方式,设置为horizontal(水平),vertical(垂直),默认为垂直排列;
3.LinearLayout子元素控制
LinearLayout的子元素,即LinearLayout中的组件, 都受到LinearLayout.LayoutParams控制,因此LinearLayout包含的子元素可以执行下面的属性.
(1)对齐方式
xml属性:
android:
layout_gravity;
作用:
指定该元素在LinearLayout(父容器)的对齐方式;
(2)所占权重
xml属性:
android:
layout_gravity;
作用:
指定该元素在LinearLayout(父容器)中所占的权重;
4.控制子元素排列与在父元素中排列
控制本身元素属性与子元素属性 :
带layout的属性是设置本身,例如android:
layout_gravity设置的是本身的对其方式;不带layout的属性是设置其所包含的子元素,例如android:
gravity设置的是该容器子组件的对齐方式;
所有的布局管理器都提供了相应的LayoutParams内部类,这些内部类用于控制布局中子元素的布局,如对齐方式layout_gravity,所占权重layout_weight,这些属性用于设置本元素在父容器中的对齐方式;
android:
gravity作用是指定本元素包含的子元素的对齐方式,只有容器才支持这个属性;
5.常见用法
(1)获取LinearLayout的宽高
a.组件外无法获取组件宽高
调用View.getHeight()和View.getWidth()方法是获取不到组件的宽度和高度的,这两个方法返回的是0;Android的运行机制决定了无法在组件外部使用getHeight()和getWidth()方法获取宽度和高度,在自定义的类中可以在View的类中通过调用这两个方法获取该View子类组件的宽和高;
b.组件外部获取View对象宽高方法
使用View.getMeasuredWidth()和View.getMeasuredHeight()方法可以获取组件的宽和高,在调用这个方法之前,必须先调用View.measure()方法,才可以,否则也获取不到组件的宽高;
注意:
如果组件宽度或高度设置为fill_parent,使用getMeasuredHeight()等方法获取宽度和高度的时候,并且组件中含有子元素时,所获取的实际值是这些组件所占的最小宽度和最小高度.
示例:
Viewview=getLayoutInflater().inflate(R.layout.main,null);
LinearLayoutlayout=(LinearLayout)view.findViewById(R.id.linearlayout);
//调用测量方法,调用了该方法之后才能通过getMeasuredHeight()等方法获取宽高
layout.measure(0,0);
//获取宽度
intwidth=layout.getMeasuredWidth();
//获取高度
intheight=layout.getMeasuredHeight();
c.获取布局文件中组件的宽高
调用View.getLayoutParams().width和View.getLayoutParams().height获取宽高,如果宽高被设定为fill_parent,match_parent,warp_content时,这两个两边直接回返回FILL_PARENT,MATCH_PARENT,WARP_CONTENT常量值;
(2)在LinearLayout中添加分隔线
a.使用ImageView添加(低版本3.0以下)
如果布局是vertical,那么设置一个ImageView宽度fill_parent,高度2dp,设置一个背景色;
如果布局是horizontal,那么设置一个ImageView宽度2dp,高度fill_parent,设置一个背景色;
android: layout_width="fill_parent" android: layout_height="2dp" android: background="#F00"/> b.使用xml属性添加(3.0以上版本) 设置LinearLayout标签的android: showDividers属性,该属性有四个值: none: 不显示分隔线; beginning: 在LinearLayout开始处显示分隔线; middle: 在LinearLayout中每两个组件之间显示分隔线; end: 在LinearLayout结尾处显示分隔线; 设置android: divider属性,这个属性的值是一个Drawable的id; c.使用代码添加(3.0以上版本) 设置显示分隔线样式: linearLayout.setShowDividers(),设置android: showDividers属性; 设置分隔线图片: linearLayout.setDividerDrawable(),设置android: divider属性; 6.实际案例 (1)按钮排列 要点: 左边的LinearLayout的android: gravity属性为bottom|center_horizontal; 右边的LinearLayout的android: gravity属性为right|center_vertical; 代码: xmlversion="1.0"encoding="utf-8"? > xmlns: android=" android: layout_width="fill_parent" android: layout_height="fill_parent" android: orientation="vertical" android: gravity="bottom|center_horizontal"> android: layout_width="wrap_content" android: layout_height="wrap_content" android: text="按钮1"/> android: layout_width="wrap_content" android: layout_height="wrap_content" android: text="测试按钮2"/> android: layout_width="wrap_content" android: layout_height="wrap_content" android: text="按钮3"/> android: layout_width="wrap_content" android: layout_height="wrap_content" android: text="测试按钮4"/> android: layout_width="wrap_content" android: layout_height="wrap_content" android: text="按钮5"/> 通过修改android: gravity属性来控制LinearLayout中子元素的排列情况; 左边的图的属性为bottom|center_horizontal,右边的android: gravity的属性值为right|center_vertical; (2)三个按钮各自对齐 三个水平方向的按钮,分别左对齐,居中对齐,右对齐: 要点: 最顶层的LinearLayout的orientation是horizontal水平的; 第二层的LinearLayout的orientation是vertical垂直的,并且宽度是fill_parent,依靠权重分配宽度; 按钮的android: layout_gravity属性根据需求left,center,right,默认为left; 代码: xmlversion="1.0"encoding="utf-8"? > xmlns: android=" android: layout_width="fill_parent" android: layout_height="fill_parent" android: orientation="horizontal"> android: layout_width="fill_parent" android: layout_weight="1" android: layout_height="wrap_content" android: orientation="vertical" android: background="#f00"> android: layout_width="wrap_content" android: layout_height="wrap_content" android: text="按钮1"/> android: layout_width="fill_parent" android: layout_weight="1" android: layout_height="wrap_content" android: orientation="vertical" android: background="#0f0"> android: layout_width="wrap_content" android: layout_height="wrap_content" android: text="按钮2" android: layout_gravity="center"/> android: layout_width="fill_parent" android: layout_weight="1" android: layout_height="wrap_content" android: orientation="vertical" android: background="#00f"> android: layout_width="wrap_content" android: layout_height="wrap_content" android: text="按钮3" android: layout_gravity="right"/> 二.相对布局RelativeLayout 相对布局容器中,子组件的位置总是相对兄弟组件,父容器来决定的; 1.RelativeLayout支持的属性 (1)对齐方式 xml属性: android: gravity; 设置方法: setGravity(int); 作用: 设置布局容器内子元素的对齐方式; (2)忽略对齐方式 xml属性: android: ignoreGravity; 设置方法: setIgnoreGravity(int); 作用: 设置该组件不受gravity属性影响,因为gravity属性影响容器内所有的组件的对齐方式,设置了之后,该组件就可以例外; 2.LayoutParams属性 (1)只能设置boolean值的属性 这些属性都是相对父容器的,确定是否在父容器中居中(水平,垂直),是否位于父容器的上下左右端; 是否水平居中: android: layout_centerHorizontal; 是否垂直居中: android: layout_centerVertical; 是否位于中央: android: layout_centerInParent; 是否底端对齐: android: layout_alignParentBottom; 是否顶端对齐: android: layout_alignParentTop; 是否左边对齐: android: layout_alignParentLeft; 是否右边对齐: android: layout_alignParentRight; (2)只能设置其它组件id的属性 位于所给id组件左侧: android: layout_toLeftOf; 位于所给id组件右侧: android: layout_toRightOf; 位于所给id组件的上边: android: layout_above; 位于所给id组件的下方: android: layout_below; 与所给id组件顶部对齐: android: layout_alignTop; 与所给id组件底部对齐: android: layout_alignBottom; 与所给id组件左边对齐: android: layout_alignLeft; 与所给id组件右边对齐: android: layout_alignRight; 3.梅花布局效果 五个按钮排成梅花形状,梅花处于正中心,效果图如下: 两个按钮,如果只有android: layout_above="@+id/bt1"会是这种情况: 加上android: layout_alignLeft="@+id/bt1"就会成为这种情况: 要点: 注意每个组件的属性,先要确定方位,再进行对齐,组件左边界对齐,组件上边界对齐; 代码: xmlversion="1.0"encoding="utf-8"? > xmlns: android="android: layout_width="fill_parent" android: layout_height="fill_parent"> android: id="@+id/bt1" android: layout_width="wrap_content" android: layout_height="wrap_content" android: text="按钮1" android: layout_centerInParent="true"/> android: id="@+id/bt2" android: layout_width="wrap_content" android: layout_height="wrap_content" android: text="按钮2" android: layout_above="@+id/bt1" android: layout_alignLeft="@+id/bt1"/> android: id="@+id/bt3" android: layout_width="wrap_content" android: layout_height="wrap_content" android: text="按钮3" android: layout_centerInParent="true" android: layout_below="@+id/bt1" android: layout_alignLeft="@+id/bt1"/> android: id="@+id/bt4" android: layout_width="wrap_content" android: layout_height="wrap_content" android: text="按钮4" android: layout_centerInParent="true" android: layout_toLeftOf="@+id/bt1" android: layout_alignTop="@+id/bt1"/> android: id="@+id/bt5" android: layout_width="wrap_content" android: layout_height="wrap_content" android: text="按钮5" android: layout_centerInParent="true" android: layout_toRightOf="@+id/bt1" android: layout_alignTop="@+id/bt1"/> 4.相对布局常用方法 (1)获取屏幕中一个组件的位置 要先创建一个整型数组,数组大小2位;这个数组传入getLocationOnScreen()方法; 可以调用View.getLocationOnScreen()方法,返回的是一个数组int[2],int[0]是横坐标,int[1]是纵坐标; //获取组件 Buttonb=(Button)this.findViewById(R.id.Button01); //创建数组,将该数组传入getLocationOnScreen()方法 intlocations[]=newint[2]; //获取位置信息 b.getLocationOnScreen(locations); //获取宽度 intwidth=locations[0]; //获取高度 intheight=locations[1]; (2)LayoutParams的使用设置所有属性 属性设置方法少: AndroidSDK中View类只提供了很少用于设置属性的方法,大多数属性没有直接对应的获得和设置属性值的方法,看起来貌似不是很好用; 使用LayoutParams设置属性值: Android中可以对任何属性进行设置,这里我们需要一个LayoutParams对象,使用这个LayoutParams.addRule()方法,可以设置所有组件的属性值;设置完之后调用View.setLayoutParams()方法,创建刚才的LayoutParams对象,并更新View的相应的属性值; 代码中动态设置布局属性: a.创建LayoutParams对象 b.调用LayoutParams对象的addRule()方法设置对应属性; c.调用View.setLayoutParams()方法将设置好的LayoutParams对象设置给组件; d.调用addView方法将View对象设置到布局中去; 使用代码设置android: layout_toRightOf和android: layout_below属性: //装载布局文件 RelativeLayoutrelativeLayout=(RelativeLayout)getLayoutInflater().inflate(R.layout.relative,null); //装载要动态添加的布局文件 Buttonbutton=(Button)relativeLayout.findViewById(R.id.bt1); //创建一个LayoutParams对象 LayoutParamslayoutParams=newLayoutParams(LayoutParams.WRAP_CONTENT, LayoutParams.WRAP_CONTENT); //设置android: layout_toRightOf属性 layoutParams.addRule(RelativeLayout.RIGHT_OF,R.id.bt2); //设置android: layout_below layoutParams.addRule(RelativeLayout.BELOW,R.id.bt2)


- 配套讲稿:
如PPT文件的首页显示word图标,表示该PPT已包含配套word讲稿。双击word图标可打开word文档。
- 特殊限制:
部分文档作品中含有的国旗、国徽等图片,仅作为作品整体效果示例展示,禁止商用。设计者仅对作品中独创性部分享有著作权。
- 关 键 词:
- Android布局管理器 详细解析布局实现 Android 布局 管理器 详细 解析 实现
 冰点文库所有资源均是用户自行上传分享,仅供网友学习交流,未经上传用户书面授权,请勿作他用。
 《赶海》的教学设计.docx
-
《谏逐客书》文言现象翻译默写选择阅读习题必修下册.docx
-
《05 》教学设计和期末教学论文.docx
-
《美丽心灵》的观后感.docx
-
《化学反应的快慢和限度》教案鲁科版必修2.docx
-
《数据库系统及应用》高教第二版习题解答.docx
-
《离子反应》教学设计.docx
-
《佘山银湖别墅》分阶段营销策略报告.docx
-
《外国小说欣赏》教学中阅读主体的缺失与重塑.docx
-
《电工基础》试题工程类.docx
-
《用人单位职工参加社会保险承诺书》.docx
-
06G1016陈青来解疑.docx
-
08版标准化就业经理.docx
-
10篇部编版小学语文三年级上册课内外阅读理解专项训练完整版含答案.docx
-
15MW风电机组运行维护手册.docx
-
27图形的相似全章导学案 1.docx
-
99TcmM IBI联合γ探测仪定位甲状旁腺瘤.docx
-
00642传播学概论笔记.docx
-
123402G05A29A0 认证产品元器件变更流程.docx
-
chapter 10 lg culture adn society for BA.docx
-
Dktifa托福听力讲座类高频专业词汇分类汇编.docx
-
ktv装修合同书.docx
-
Unit9Whatdoeshelooklike教案新版人教新目标版.docx
-
《邓稼先》《口技》课后题及答案.docx
-
《和氏献璧》教学设计.docx
-
《宿舍信息管理系统》需求分析说明书.docx
-
1教育学复习确定版10.docx
-
2万吨汽车配件制造项目可行性研究报告.docx
-
5 QTZ50塔式起重机安拆方案及多塔防碰.docx
-
9岗位职责.docx
-
19雾在哪里19雾在哪里.docx
-
42《水的组成》表格上课学习上课学习教案.docx
-
刑事回避制度的观念更新与改革本科毕设论文.docx
-
硒氧化物项目可行性研究报告.docx
-
完整版图文转换之流程图教师版.docx
-
ISO9000国家注册审核员考试大纲第二版.docx
-
教育学习文章健身中心创业计划书.docx
-
完整某县乡镇就业与社会保障服务站工程建设项目可行性研究报告.docx
-
JAVA题库.docx
-
解读《两会》.docx
-
网络安全实训3应用安全.docx
-
项目10 电风扇的维修.docx
-
项目实施合作协议官方.docx
-
届二轮复习 定语从句考点讲与练 12页word版.docx
-
网上支付与结算.docx
-
届高考英语二轮复习 专题七 并列句和复合句分层训练.docx
-
Minecraft史蒂夫历险记.docx
-
银川一中四模宁夏银川一中届高三第四次模拟考试 理科综合试题 Word版含答案.docx
-
小班上学期班务总结.docx
-
银行营销明星演讲稿.docx
-
文综周周练一.docx
